Getting Started
Prerequisites
Ensure you have Node-RED installed and running. If not, follow the installation guide.
- Node.js: v14.0+
- Node-RED: v3.0.0+
- Home Assistant: v2021.3.0+
Installation
Using the Palette Manager
- Open the Palette Manager in Node-RED.
- Search for
node-red-contrib-home-assistant-websocket. - Install the package.
Using npm from the Command Line
$ cd ~/.node-red
$ npm install node-red-contrib-home-assistant-websocket
# Restart Node-RED
Home Assistant Add-on
The Community Home Assistant add-on includes this set of nodes pre-installed and pre-configured for connection to Home Assistant. You can start building your first automation immediately.
Find the add-on here: Home Assistant Add-on.
Configuration
Add an Events: all node to your workspace and open its settings.
Click the pencil icon next to the Server field.

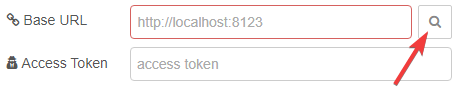
Locate your local Home Assistant instance or manually enter the Base URL.
Enter an Access Token in the server configuration, then save the settings and deploy the changes.
After deploying, you should see a green status box below the Events: all node, indicating connection (e.g., "connected" or "state_changed"). If the box is open and shows "connecting" or "disconnected," double-check the Base URL or access token.
- Base URL: The web address and port for accessing the Home Assistant frontend (e.g., http://localhost:8123, http://192.168.x.x, or http://example.duckdns.org).
- Access Token: Generated in Home Assistant. See the instructions below for creating one.
Tips
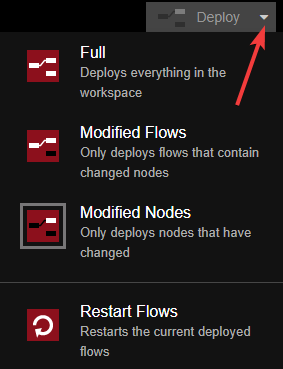
To prevent reloading all flows on deployment, change the deploy type to Modified Flows or Modified Nodes. This only reloads the flows you've modified.
If new entities aren't appearing in the autocomplete results, try unchecking Cache Autocomplete Results in the server configuration and restart Node-RED.
Generate Access Token
WARNING
The user creating the access token must belong to the administrator group for this package to function correctly.
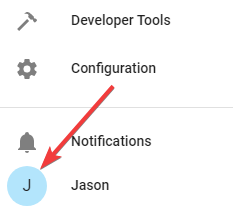
Go to your Home Assistant home page. In the bottom left corner, click on the blue circle with your initial (e.g., "J").
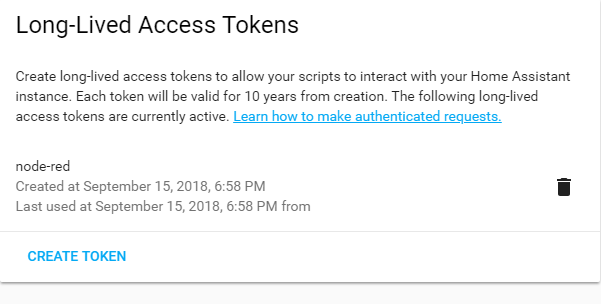
Scroll to the bottom of the page and click Create Token.
Name the token for easy identification.
Copy the generated access token into Node-RED.
Additional Tips
- Creating a separate Home Assistant user for Node-RED allows you to track which entities were modified by Node-RED.
- After configuring the WebSocket connection using the Events: all node, consider removing it for better performance. Instead, use specific nodes like Events: state or Trigger: state, or apply an event filter to avoid overloading the WebSocket message queue.