First Automation
For your first automation, let's keep it simple by setting up a light to turn on when the sun sets and off when it rises.
This example uses the sun.sun entity in Home Assistant, which has states below_horizon and above_horizon, to trigger the light.
Events: State Node
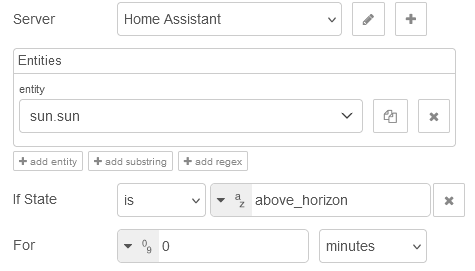
- Drag an Events: state node onto the workspace and double-click it to edit.

Entity ID Configuration
- In the Entity ID field, enter
sun.sun. This is the entity that will trigger the automation.
If State Condition
The If State condition checks the entity's state when the node is triggered. If the condition is
true, the message will be sent through the top output; iffalse, it will be sent through the bottom output. If no condition is set, all messages will pass through a single output.For this example, set the If State to
above_horizon.
Action Node
Now, let's set up the actions that will be triggered. Most Home Assistant interactions are done through action calls, which we'll handle with the Action node.
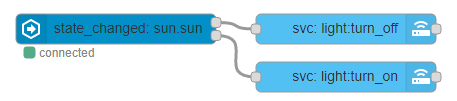
Drag two Action nodes onto the workspace and connect them to the outputs of the Events: state node.

- Since we set the If State to
above_horizon, the top output will turn off the light, and the bottom output will turn it on.
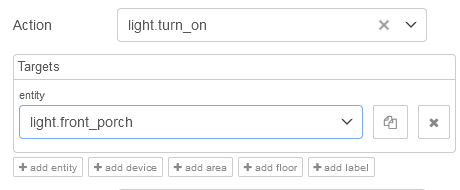
- Configure the Action nodes:
- Action:
light.turn_off(for the top output) andlight.turn_on(for the bottom output) - Entity:
light.front_porch
- Action:
Complete Automation
- Once you've configured everything, deploy your flow. You now have your first working automation in Node-RED!
[{"id":"b74ada49.d7e408","type":"server-state-changed","z":"ffbd7f06.4a014","name":"","version":1,"exposeToHomeAssistant":false,"haConfig":[{"property":"name","value":""},{"property":"icon","value":""}],"entityidfilter":"sun.sun","entityidfiltertype":"exact","outputinitially":false,"state_type":"str","haltifstate":"above_horizon","halt_if_type":"str","halt_if_compare":"is","outputs":2,"output_only_on_state_change":true,"x":244,"y":784,"wires":[["1f467cbb.0c3983"],["da5ff3e0.cbb2a"]]},{"id":"1f467cbb.0c3983","type":"api-call-service","z":"ffbd7f06.4a014","name":"","version":1,"debugenabled":false,"service_domain":"light","service":"turn_off","entityId":"light.front_porch","data":"","dataType":"json","mergecontext":"","output_location":"","output_location_type":"none","mustacheAltTags":false,"x":474,"y":784,"wires":[[]]},{"id":"da5ff3e0.cbb2a","type":"api-call-service","z":"ffbd7f06.4a014","name":"","version":1,"debugenabled":false,"service_domain":"light","service":"turn_on","entityId":"light.front_porch","data":"","dataType":"json","mergecontext":"","output_location":"","output_location_type":"none","mustacheAltTags":false,"x":474,"y":832,"wires":[[]]}]
Related Resources: